Configure Organizational Chart
OrgChartX empowers you to create detailed and informative organizational charts by providing a wide range of customizable fields. You can tailor these fields to meet your specific needs, whether you're managing a simple departmental structure or a complex hierarchy.
Customizable Output Points
-
Data
Determine the type of information your organizational chart will manage. Select from a variety of field types to include the data fields relevant to your business needs and obligations.
-
Node Content
Choose what information to display within each node.
-
Node Styles
Modify the color, shape, and size of each node in the org chart.
-
Node Arrangement
Adjust the positional relationship and layout of nodes within the chart.
-
Link Styles
Customize the appearance of the lines connecting nodes.
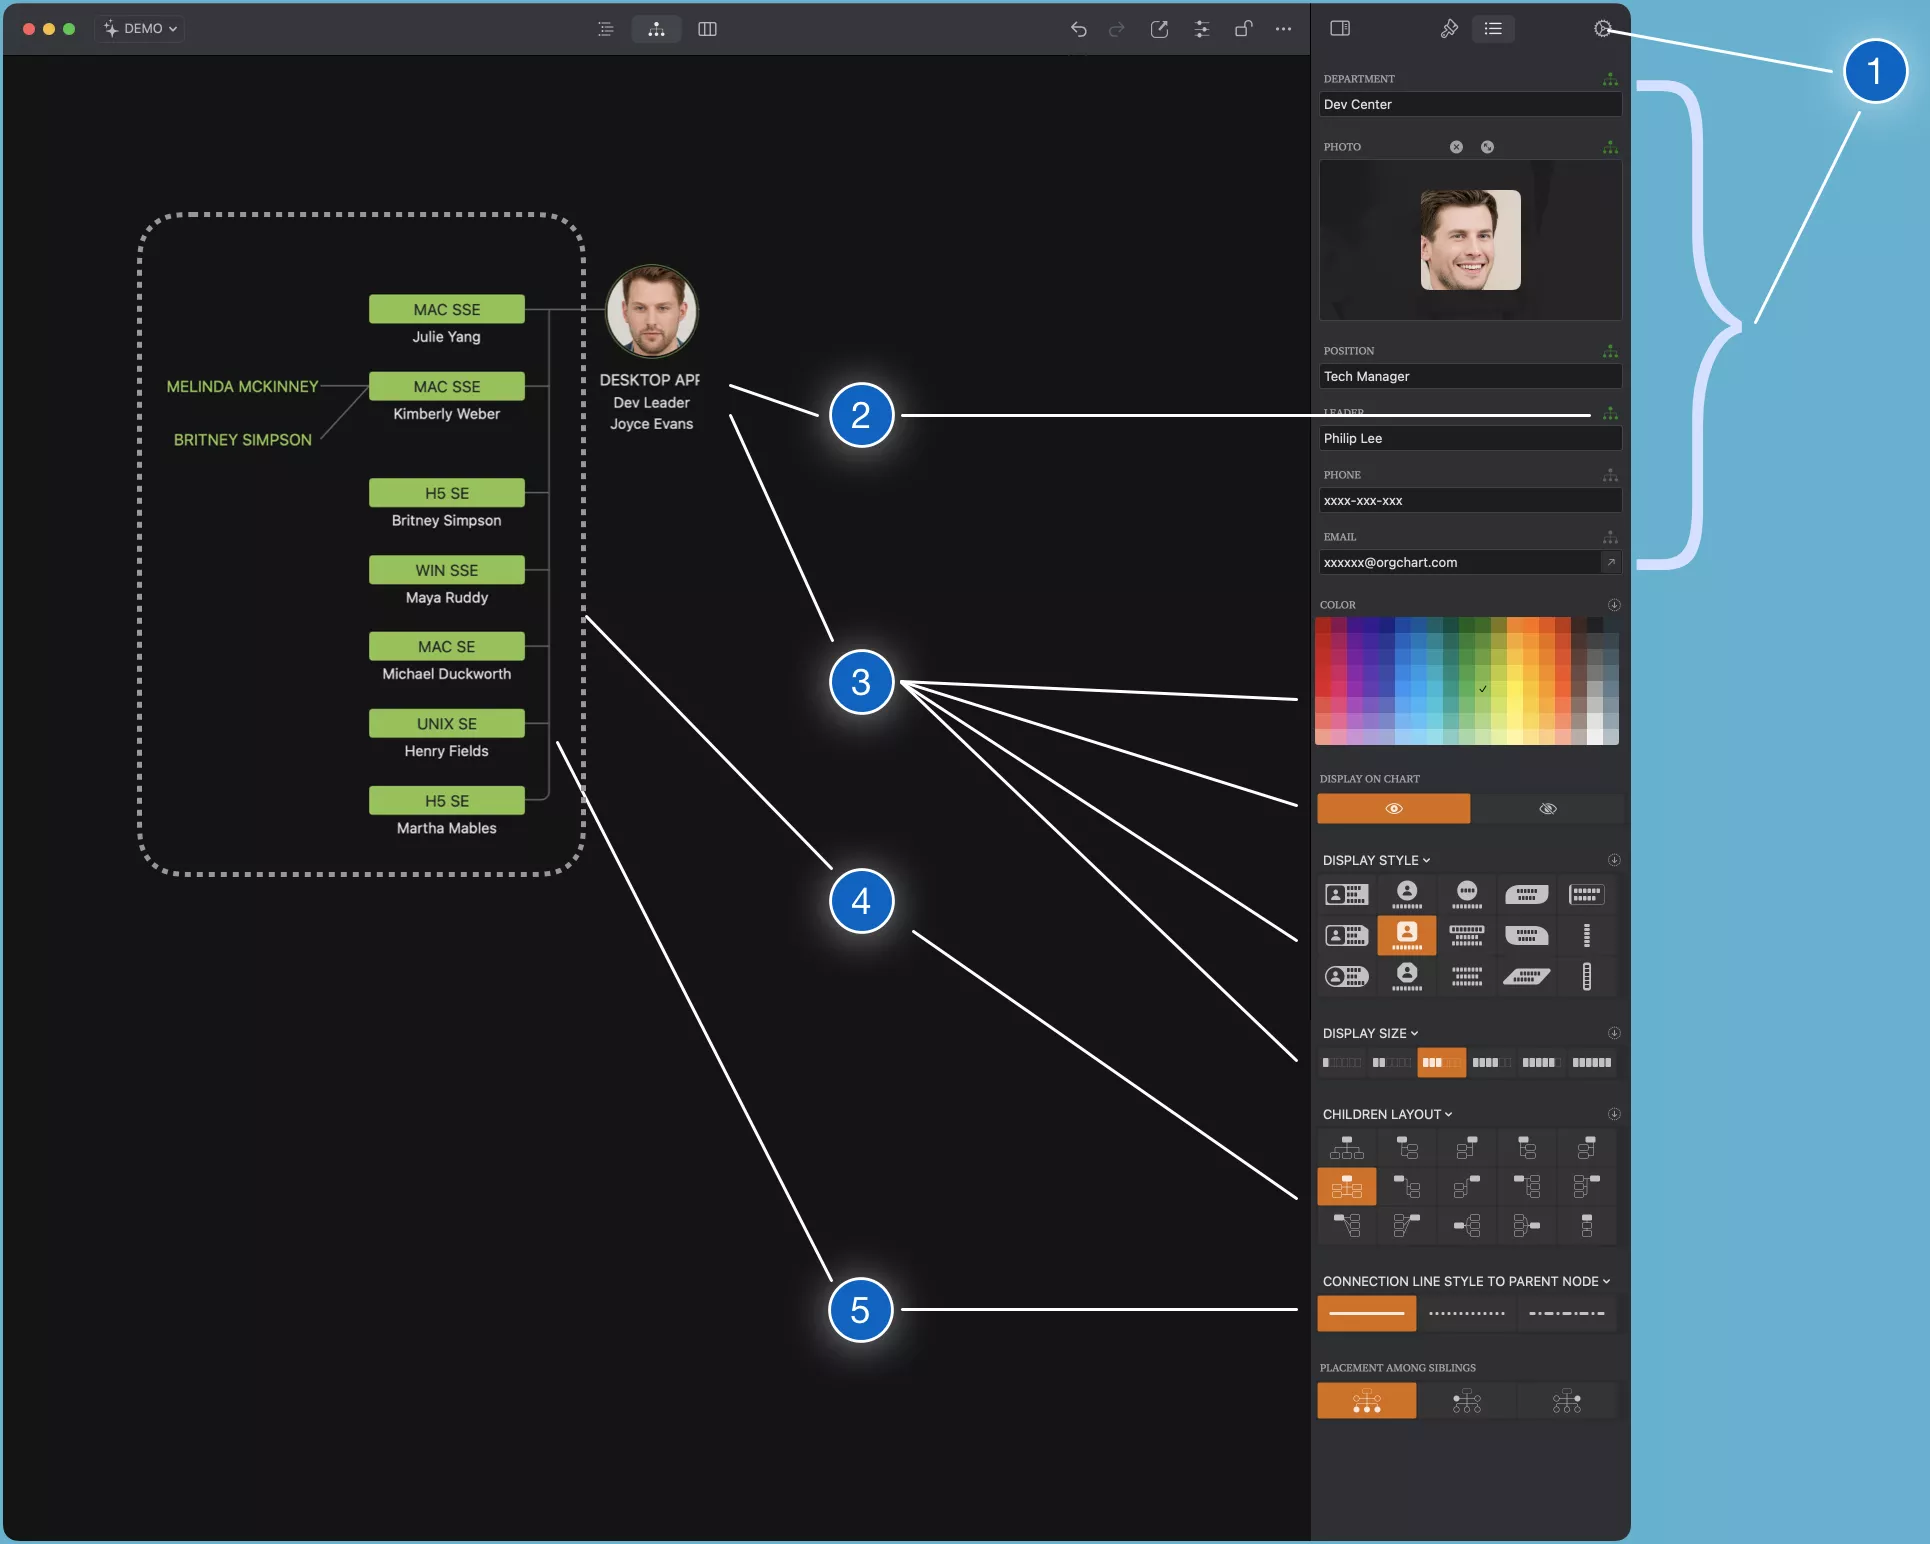
Fields
There is no universal standard for the information to be managed in an organizational chart. Your requirements may differ from others, or you may have varying data needs for the different organizational charts you generate. OrgChartX has been designed to accommodate your specific situation rather than limiting you to fixed information for the organizational charts you create. You can choose from a wide range of different data field types and configure each field to change its display title, determine its input limitations, and more.
WBS Number Field
The WBS (Work Breakdown Structure) number field represents the node's unique identifier. OrgChartX uses the WBS number as the nodes are organized in a tree structure. The content of the WBS number field is automatically generated by the application and cannot be edited by the user.
If you want to manually assign numbers or identifiers to the nodes, you can select to use a string or a number field (see details below) based on your needs.
Name Field
The Name field lets you type a single line of text for each node in the chart. While the app does not restrict the content entered in the Name field, we recommend using it as the primary identifier for a node—commonly an employee's name.
By default, the Name field is titled "Department" and shows the name of the department that the node belongs to. You can customize the title and the value of this field to match your organizational structure. For instance, you can rename the field to "Role" and show the role of the person in the node instead.
The Name field is similar to a regular one-line text field, why does the application provide a dedicated Name field? Beyond simply storing text, the Name field plays a crucial role in visualizing the hierarchical relationships among nodes. For instance, when displaying nodes in a list or a diagram, the application uses the Name field to clarify their hierarchical connections. This functionality underscores the importance of using the Name field to store definitive information that identifies each node, such as an employee name or ID.
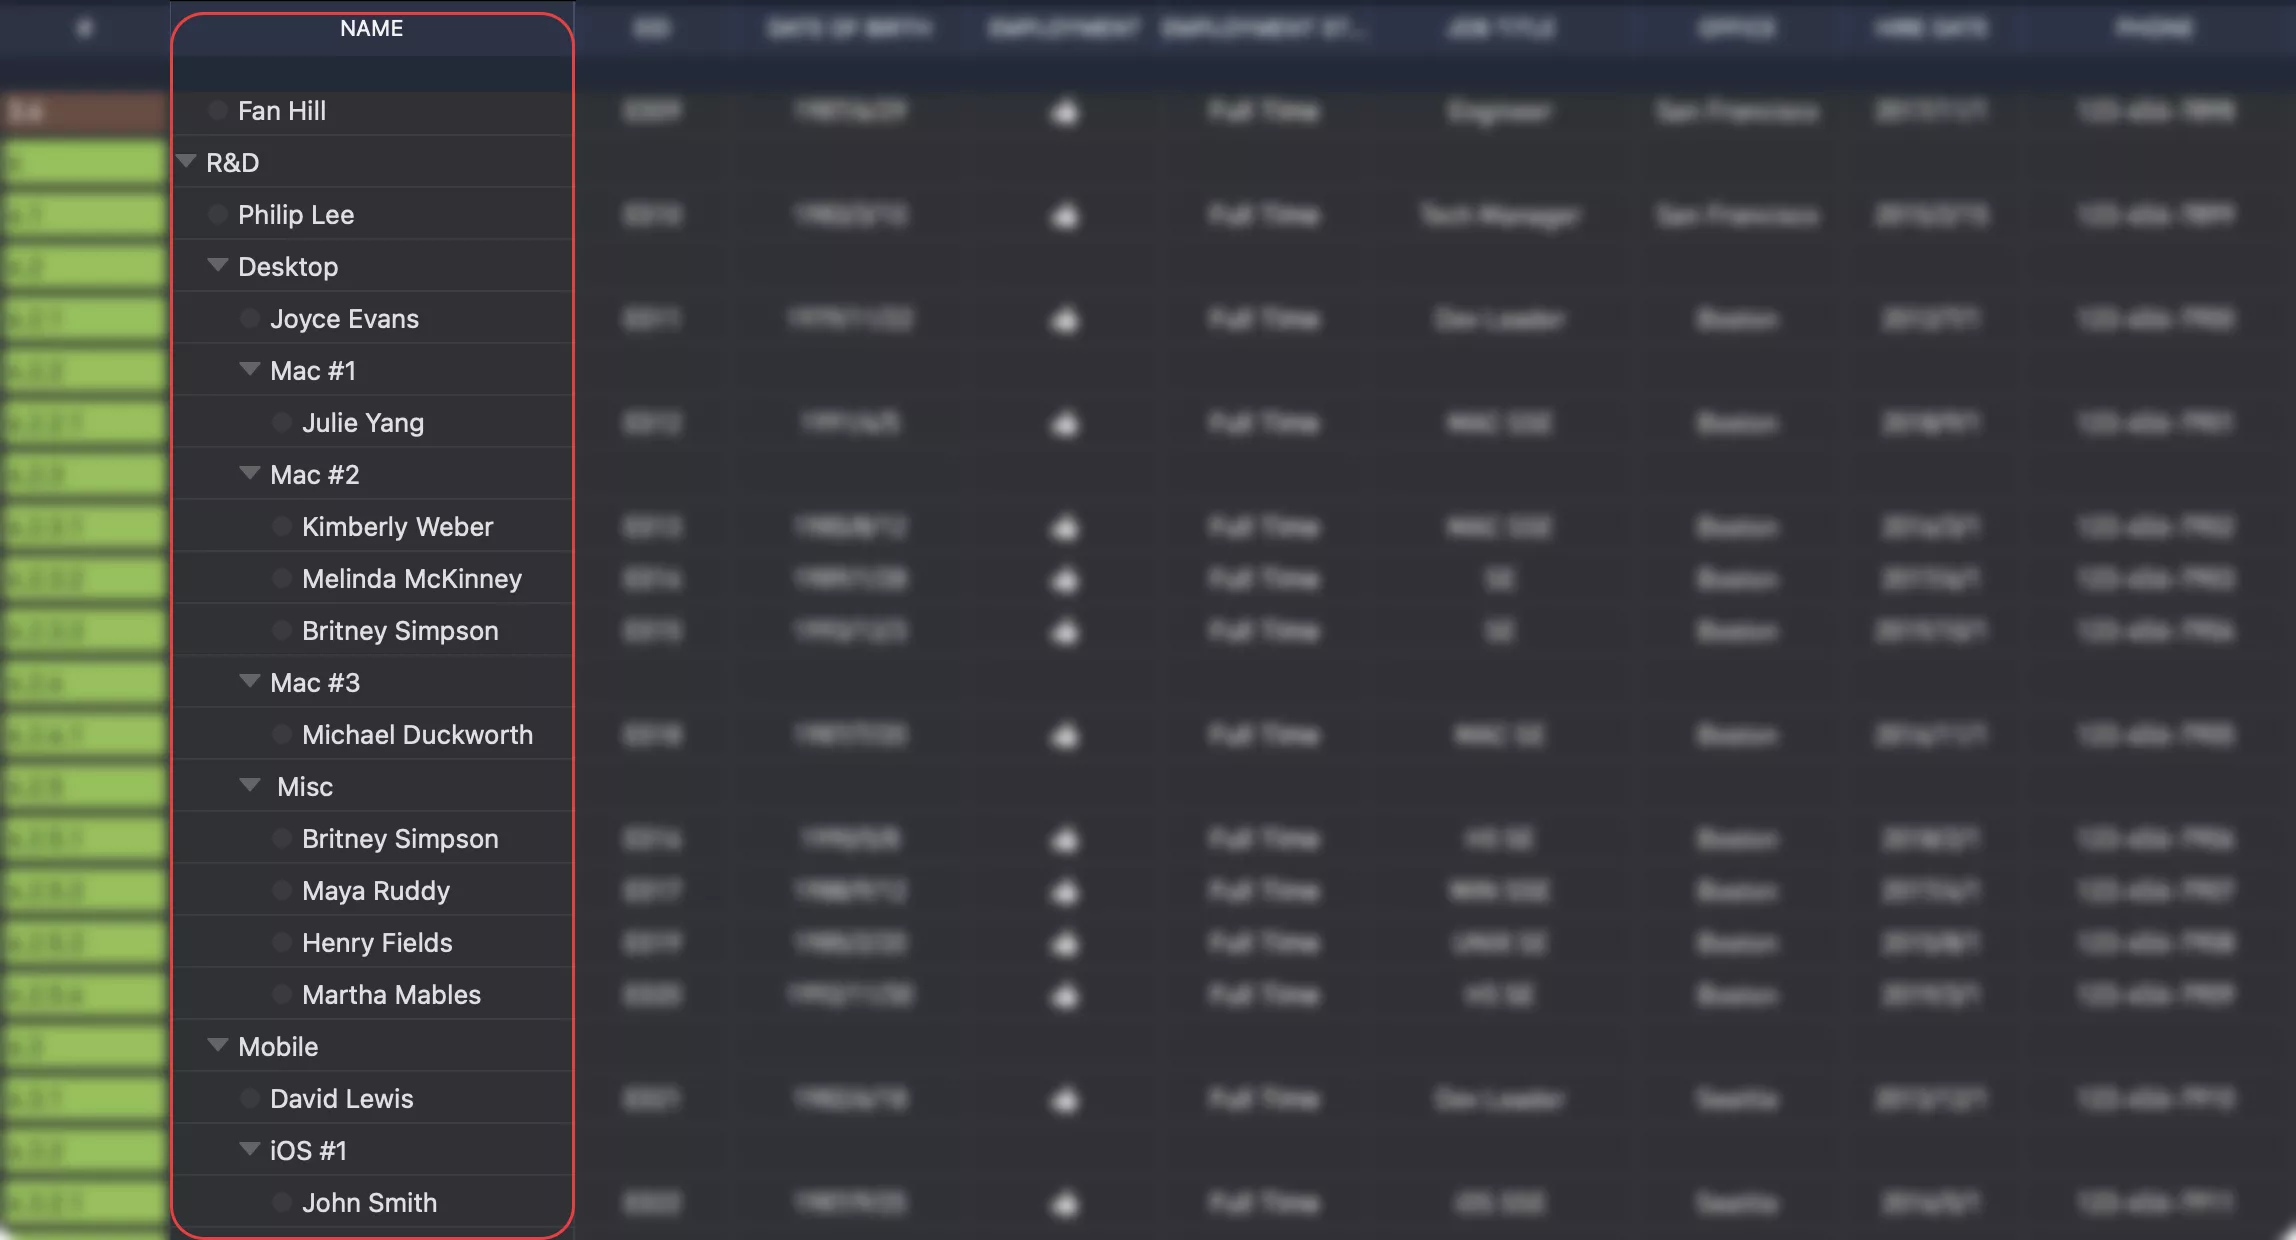
Photo Field
The Photo field lets you display a photo or image for each node in the chart. You can select a photo from your photo apps or drag an image from other apps. OrgChartX automatically adjusts the size of larger photos to fit the node and sync the data.
You can also rename the Photo field to suit your preferences.
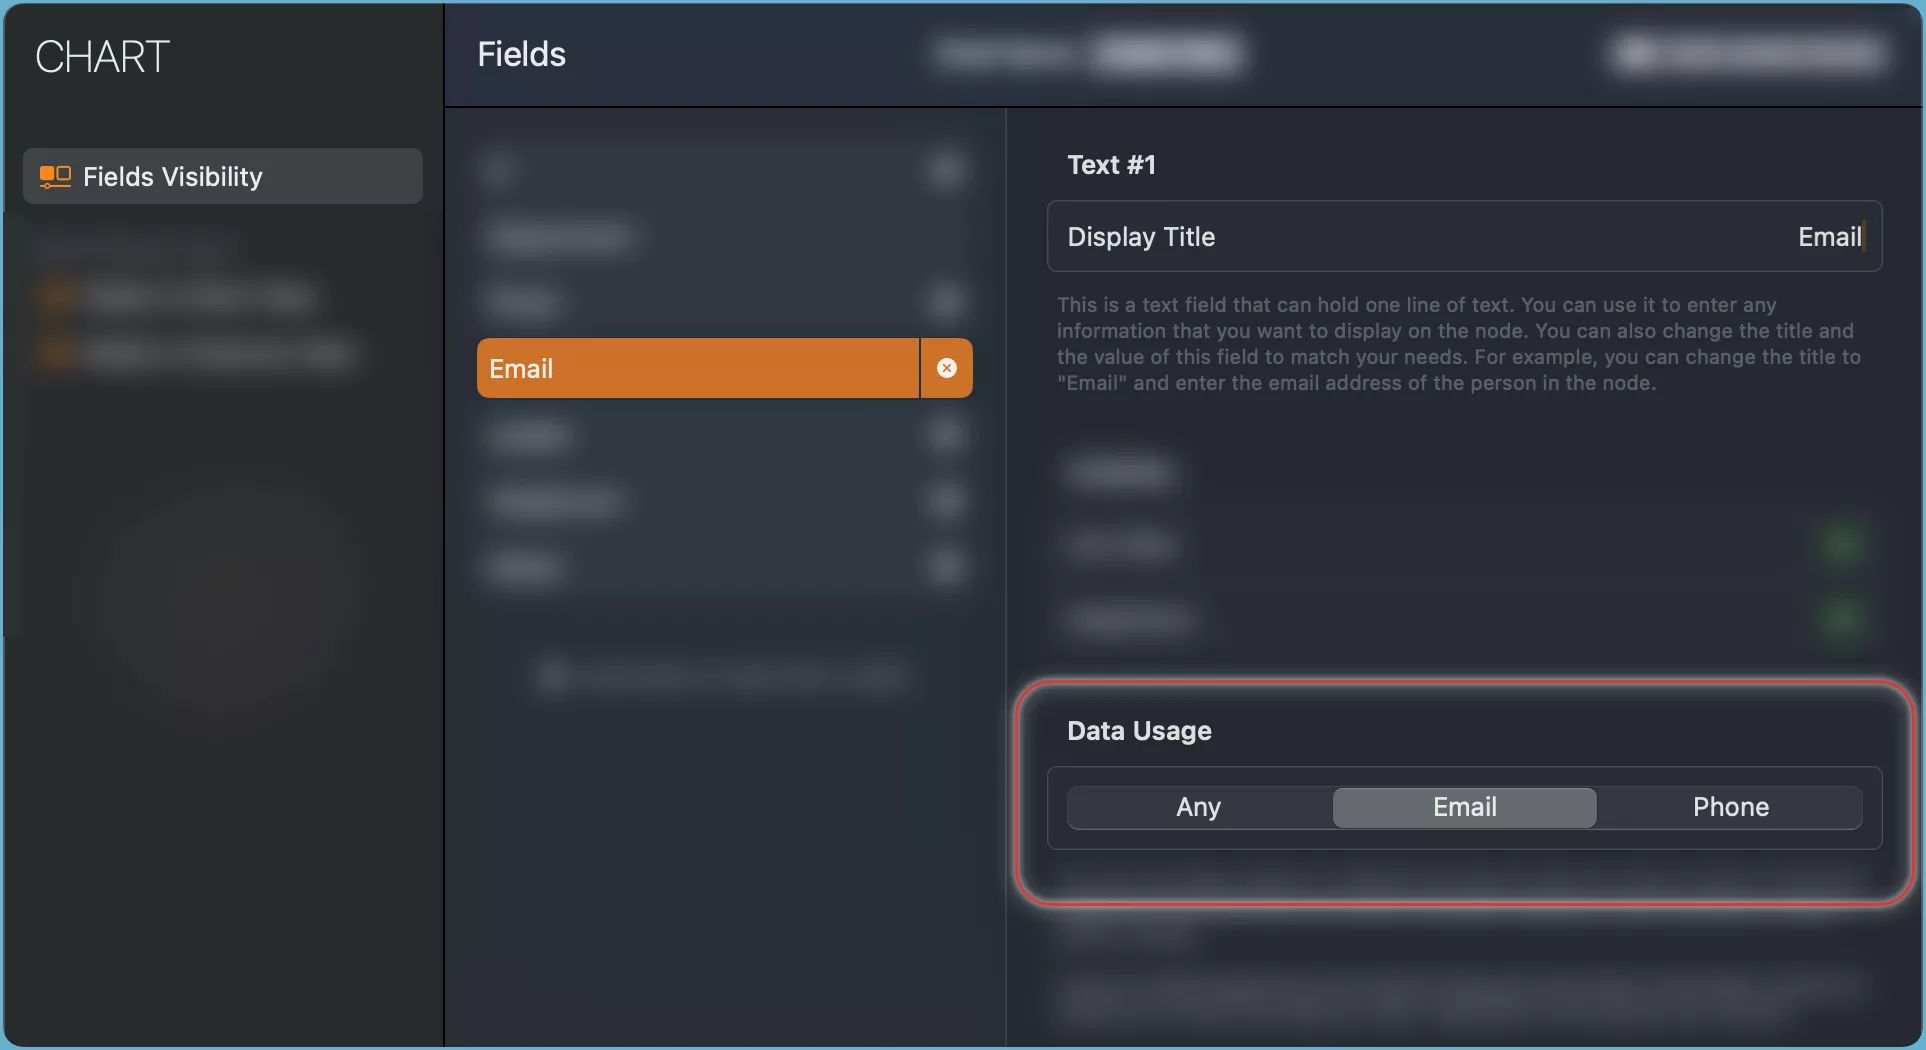
One-line String Field
The One-line String field lets you type a single line of text for each node in the chart. You have 16 one-line text fields to choose from.
You can use these fields to show any information you want on the node. You can also mark a one-line text field as an email address or phone number, so you can email or call the person in the node directly from the app.
For branch nodes, you can choose whether to enter a value for a one-line text field or leave it blank.
You can also customize the title and the value of this field to suit your preferences. For example, you can rename the field to "Email" and type the email address of the person in the node.
Here is my polished and enhanced version of your draft:
Numeric Field
The Numeric field lets you type a decimal number for each node in the chart. You have 12 numeric fields to choose from.
You can use these numeric fields to display any numerical information you want on the node. Additionally, there are options available to set the number display format, such as decimal places and number units.
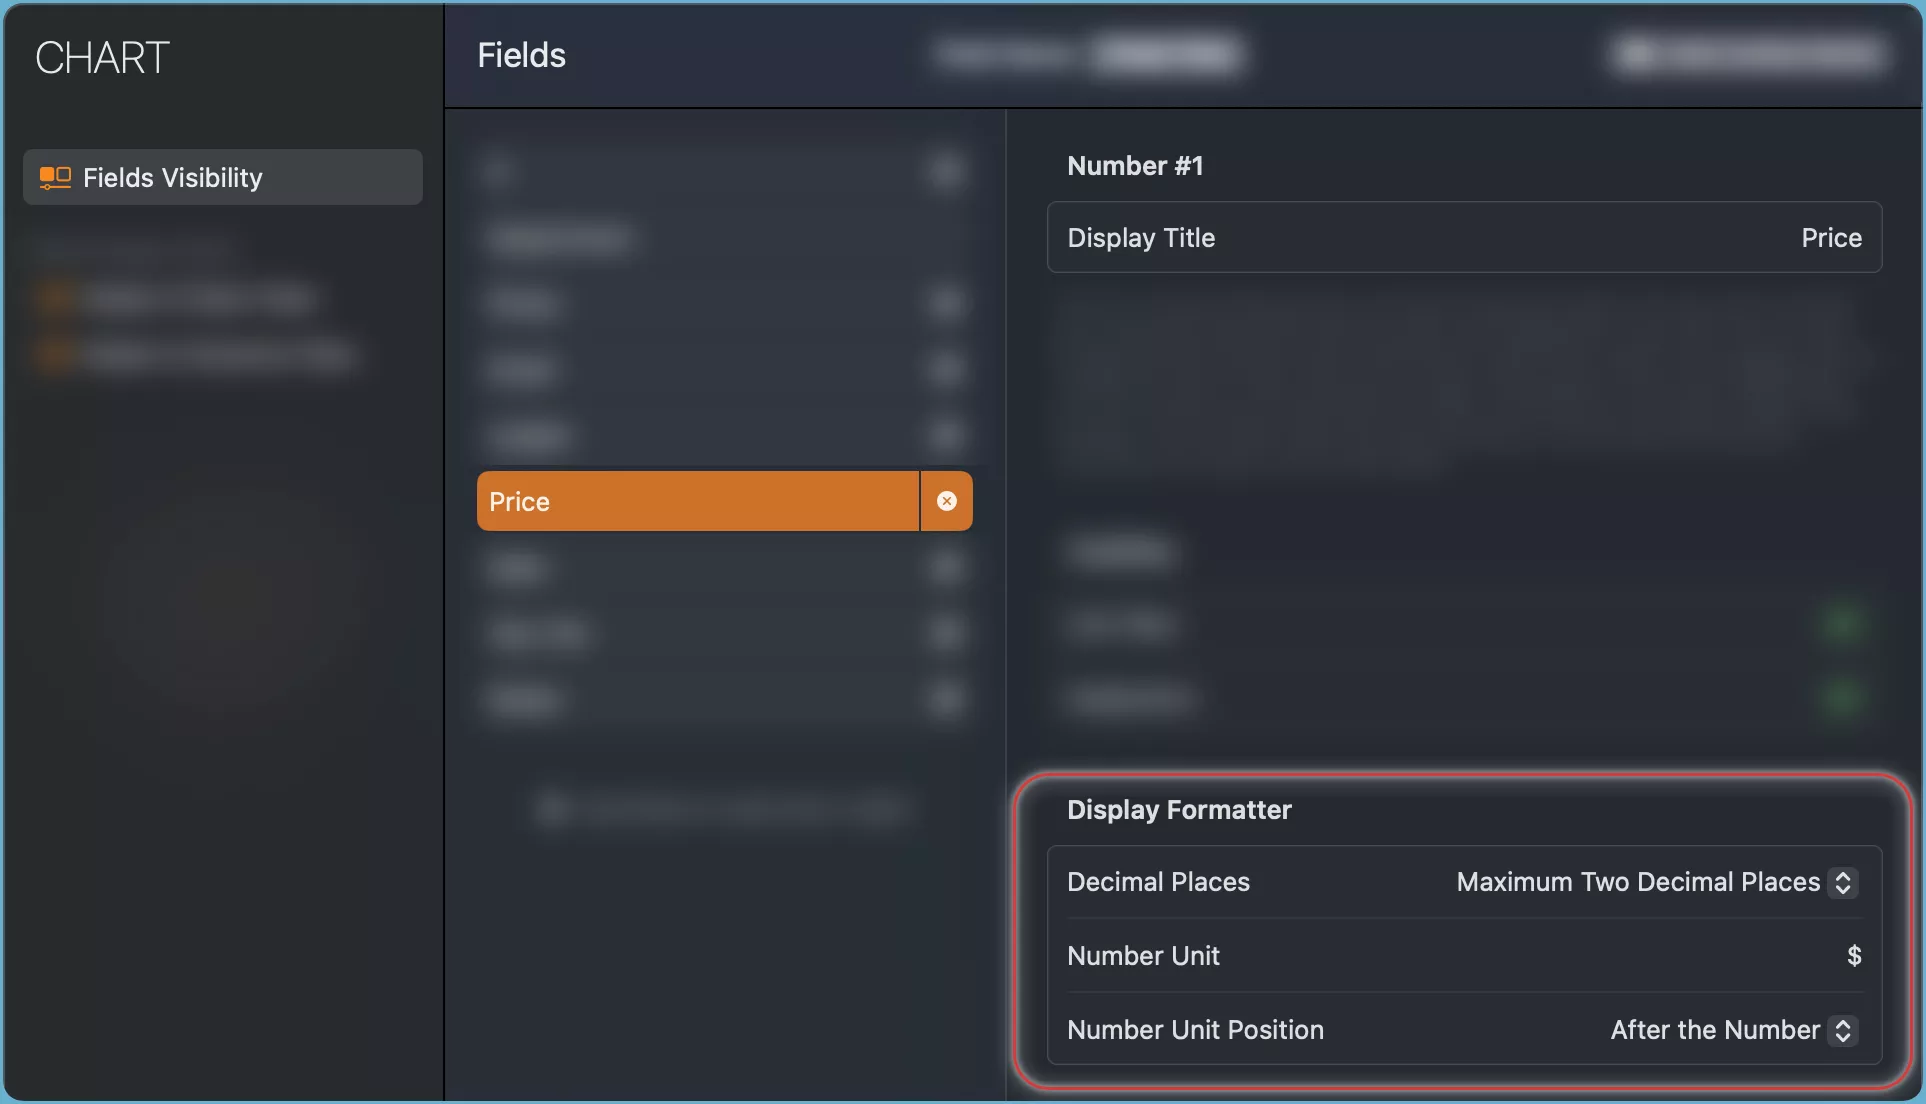
You can also customize the title and the value of this field to suit your preferences. For example, you can rename the field to "Age" and type the age of the person in the node.
For branch nodes, you can select how to calculate the value of a numeric field in the settings. You can either enter the value yourself or let the app sum up the values of the child nodes.

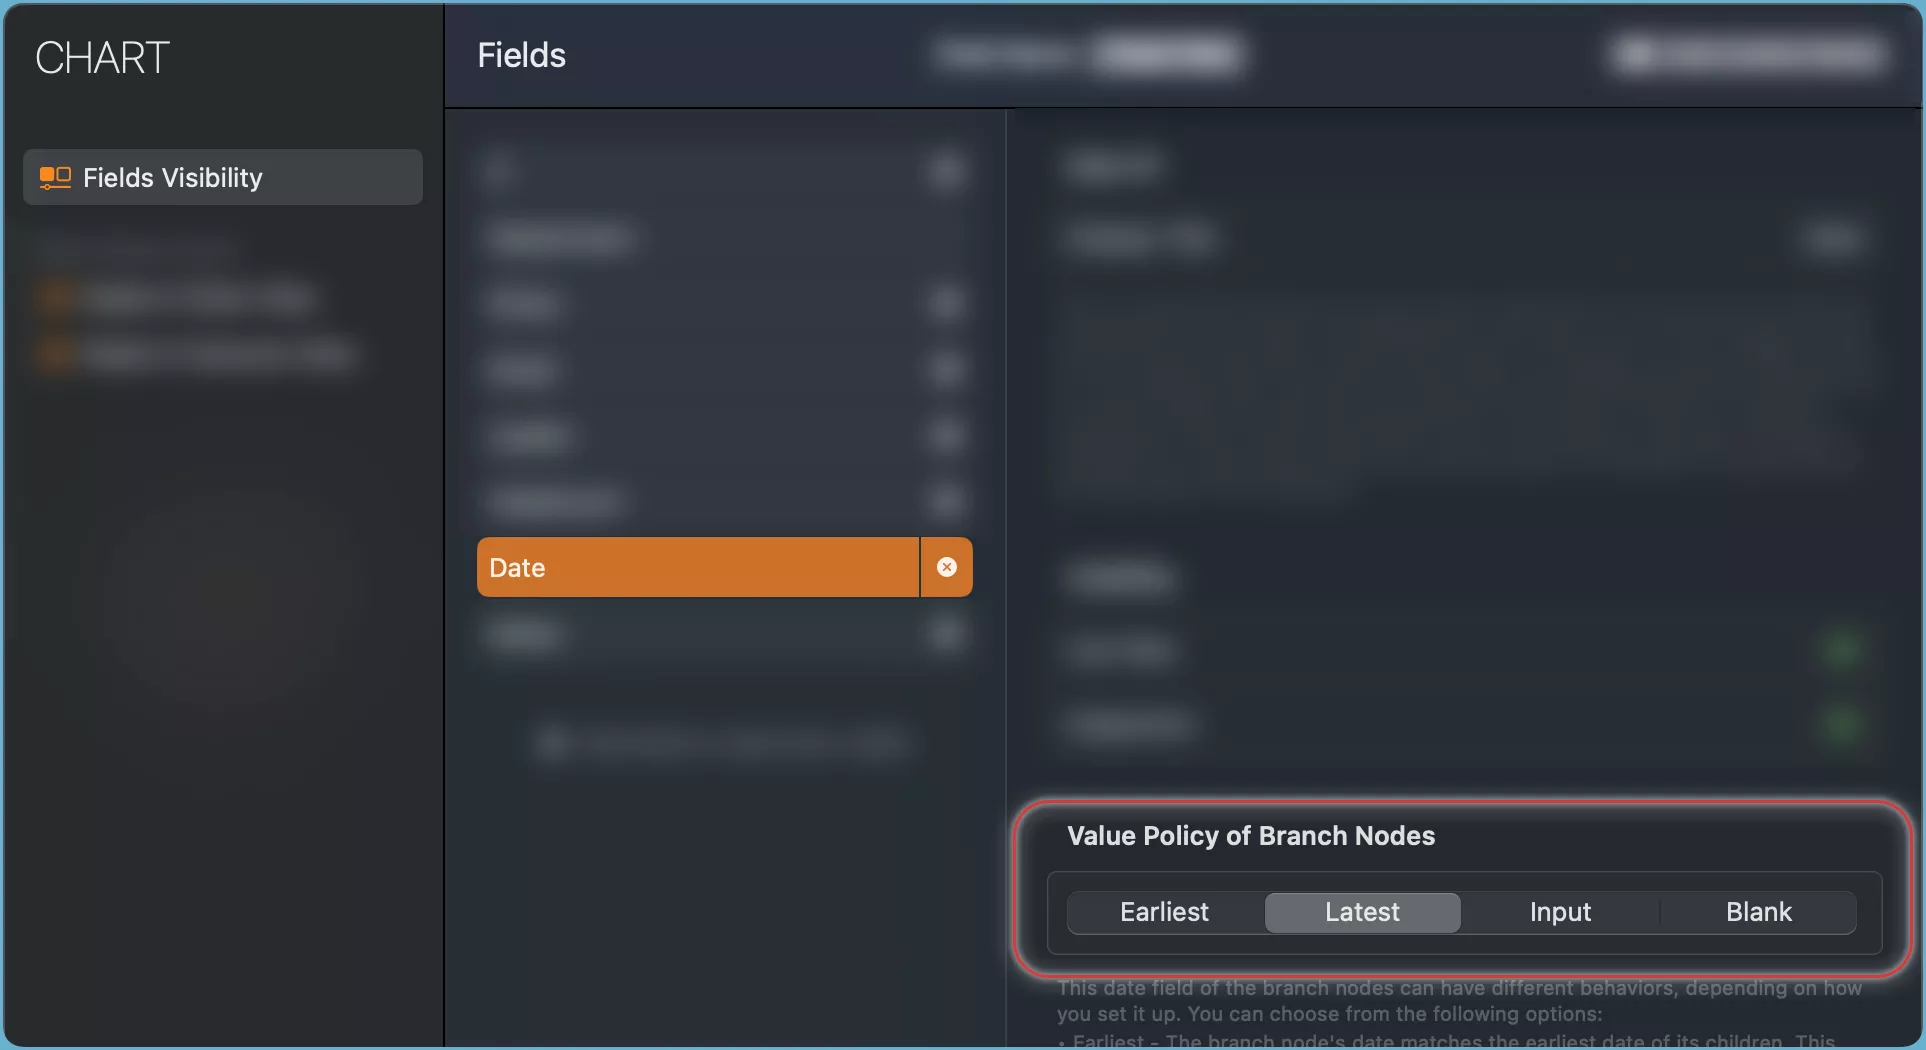
Date Field
The Date field lets you type a date for each node in the chart. You have 8 date fields to choose from.
You can use these fields to show any date information you want on the node. You can also customize the title and the value of this field to suit your preferences. For example, you can rename the field to "On-boarding Date" and type the date when the employee joined the company in the node.
For branch nodes, you can select how to fill the value of a date field in the settings. You can either enter the value yourself, let the app pick the latest or earliest date of the child nodes, or leave the field blank.
Boolean Field
The Boolean field lets you choose a yes or no value for each node in the chart. You have 5 boolean fields to choose from.
You can adjust how the yes and no values are displayed on the node. You can pick from different symbols and input options for the yes and no values.
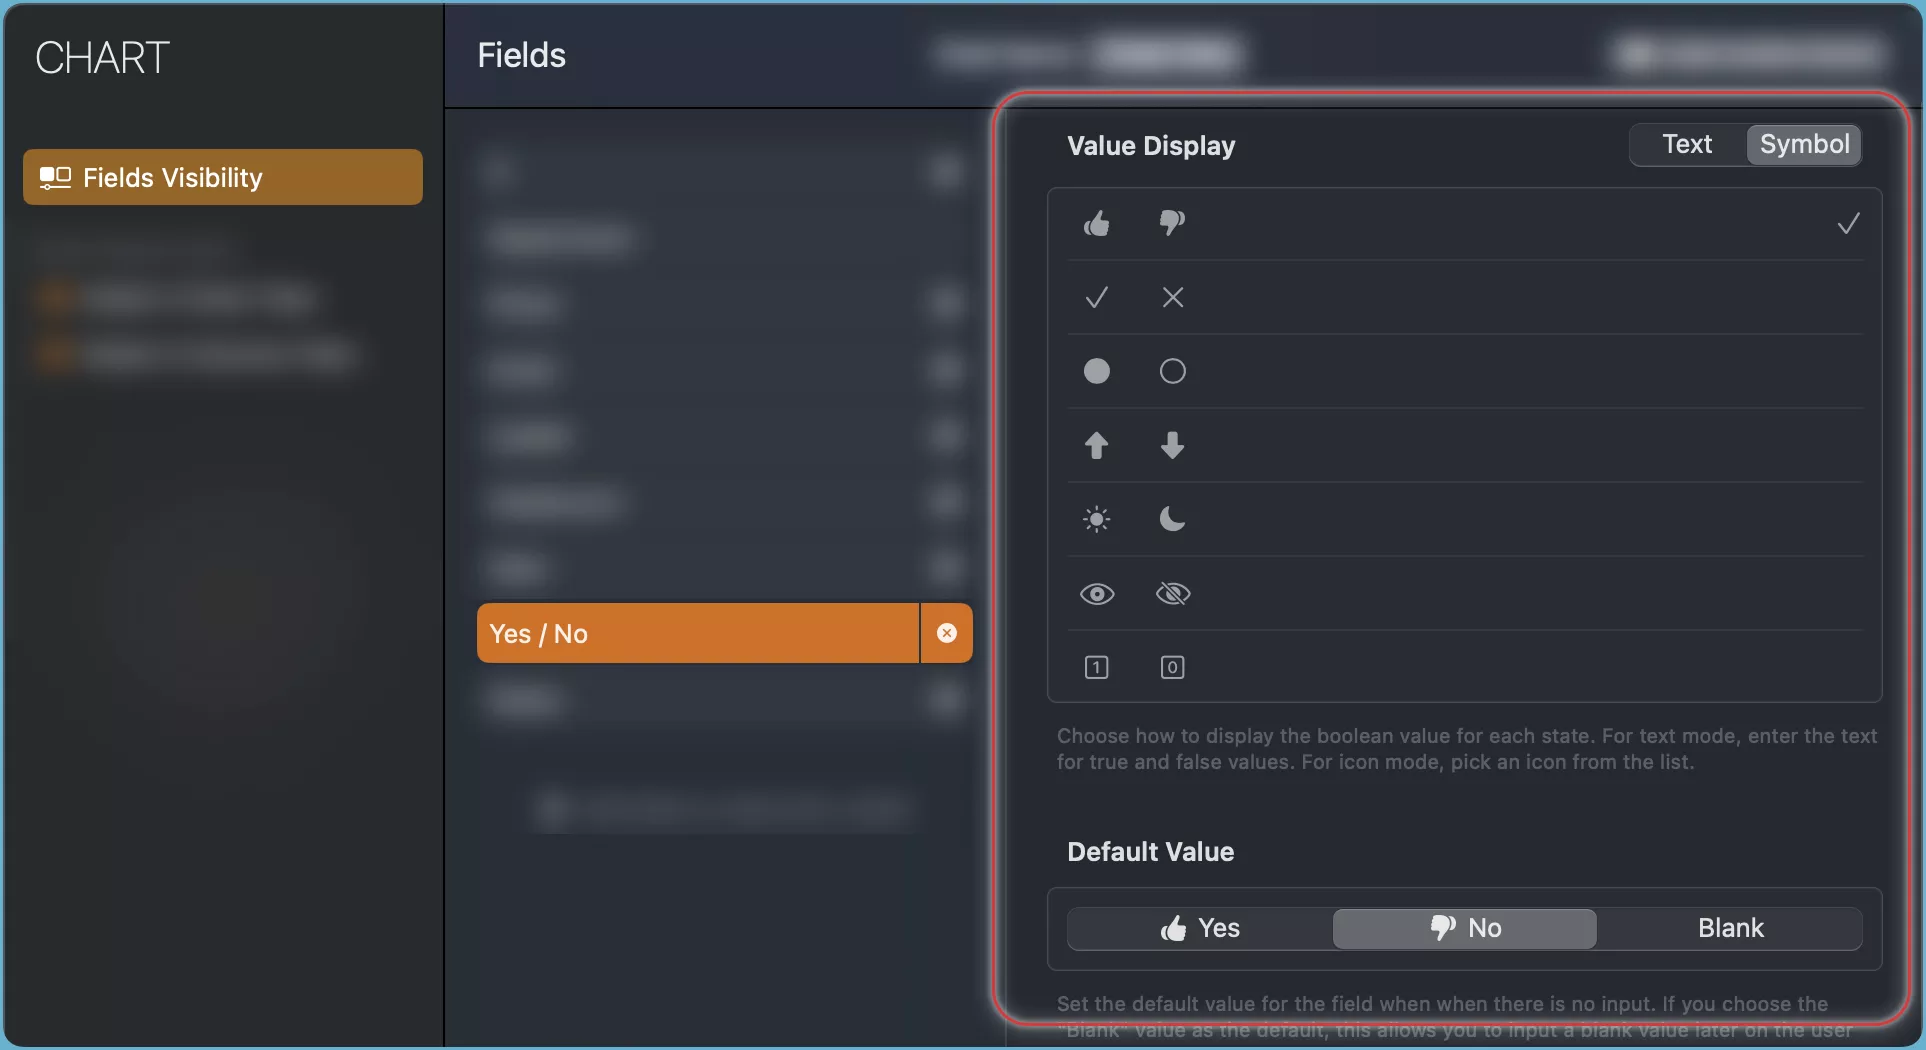
For branch nodes, you can choose whether to enter a value for a boolean field or leave it blank.
You can customize the title and the value of this field to suit your preferences. For example, you can rename the field to "Active" and choose whether the employee is currently working or not. This field is optional and not required for creating an organizational chart. You can use it if you want to.
Percentage Field
The Percentage field lets you type a percentage value from 0 to 100 for each node in the chart. You have 5 percentage fields to choose from.
For branch nodes, you can choose whether to enter a value for a percentage field or leave it blank.
You can customize the title and the value of this field to suit your preferences. For example, you can rename the field to "Completion" and type a percentage value indicating the completion of a training course. This field is optional and not required for creating an organizational chart. You can use it if you want to.
Map Location Field
The Map Location field lets you select a location on the map for each node in the chart. You have 5 location fields to choose from.
For branch nodes, you can choose whether to enter a value for a location field or leave it blank.
You can customize the title and the value of this field to suit your preferences. For example, you can rename the field to "Address" and specify an employee's residence. This field is optional and not required for creating an organizational chart. You can use it if you want to.
URL Field
The URL field lets you add a link to any online resource, such as a web page, cloud file, or more, for each node in the chart. You have 8 URL fields to choose from.
For branch nodes, you can choose whether to enter a value for a URL field or leave it blank.
You can rename the title of this field to describe the linked resource, such as "Design" for linking to design documents. This field is optional and not required for creating an organizational chart. You can use it if you want to.
Multiline Text Field
The Multiline Text field lets you type multiple lines of text for each node in the chart. You have 10 notes fields to choose from.
For branch nodes, you can choose whether to enter a value for a notes field or leave it blank.
You can use this field to show any information you want on the node. By default, the Multiline Text field is titled "Note" and shows the comment of the person in the node. You can customize the title and the value of this field to suit your preferences. For example, you can rename the field to "Profile" and type the profile of the person in the node.
Please remember that this app is designed to help you create an organizational chart, and the optional fields are just extra features. The app does not understand your specific goals or requirements for using these fields. For example, you might use one date field to show a start date and another to show an end date. You might think the app would check that the end date is after the start date when you rename the fields to "Start" and "End", but the app cannot do that because it does not know what you mean by these fields.
Customization Entries
To configure the current organizational chart, tap the ... button on the toolbar and select the Configure Chart option.
On Mac, you can also use the shortcut ⌘. to open the chart settings.

Visibility of Fields
You can select the fields that will be used in the organizational chart and visible in the grid view and inspectors.
Field Display Title
You can customize the display title of the fields.
Field Display Order
You can change the display order of the fields in the list and inspectors.
Display of the Node in the Chart View
You can choose which fields should be visible within the nodes on the chart view.
Displaying the Node in the Column View
In addition to the name field, you can choose an additional field to be displayed within the nodes in the column view.